


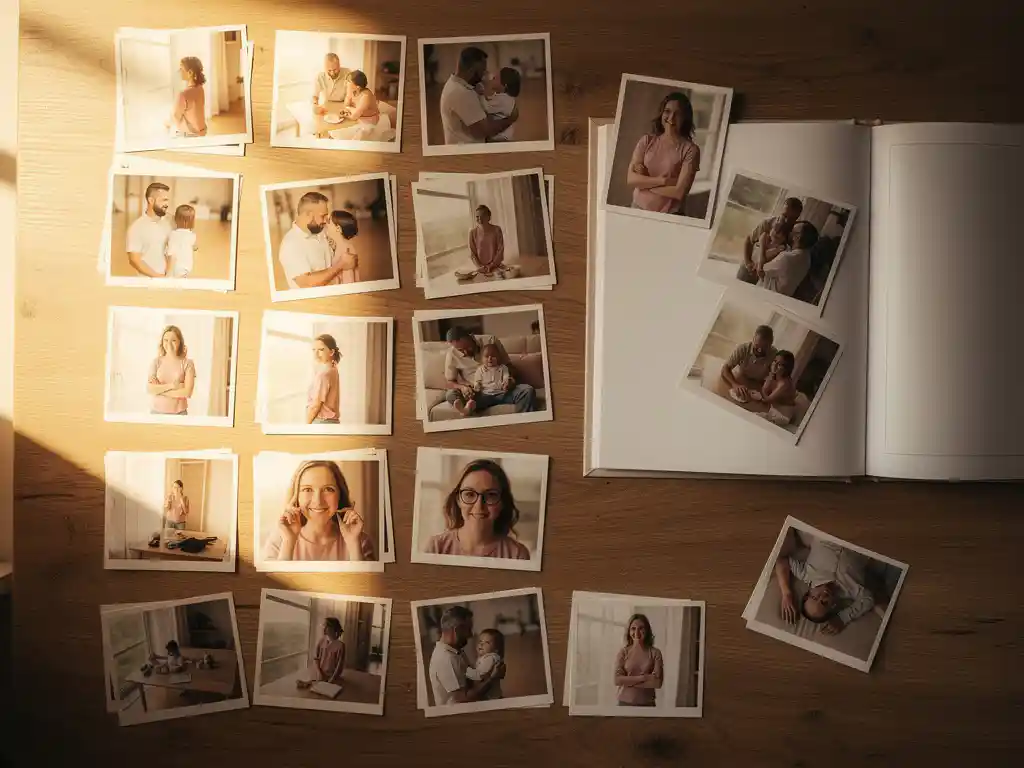
Pour organiser les photos avant de créer un album, commencez par rassembler toutes vos images en un seul endroit. Ensuite, triez-les par événement ou par date, supprimez les doublons et les clichés de mauvaise qualité, et réduisez votre sélection aux 20 à 60 meilleures images, en fonction de la longueur de votre livre. La création d'une structure claire dès le départ permet de gagner du temps et conduit à un résultat final plus cohérent.
Les bibliothèques de photos désordonnées ruinent silencieusement vos souvenirs
La plupart des gens ont des centaines, voire des milliers de photos éparpillées sur leur téléphone, dans le cloud et sur de vieux comptes de réseaux sociaux. Lorsque tout est mélangé sans ordre clair, les photos qui vous importent vraiment sont enfouies. Le coût pratique est réel : lorsque vous vous asseyez enfin pour créer un album photo, vous passez plus de temps à chercher des clichés flous et des doublons qu'à apprécier le processus. La solution est simple mais nécessite une première étape délibérée. Choisissez un endroit pour rassembler vos photos, que ce soit la pellicule de votre téléphone, Google Photos ou un dossier sur votre ordinateur, et partez de là. Une bibliothèque contenue et monocaline rend chaque étape suivante plus rapide.
Garder chaque photo nuit à la qualité de votre album
L'instinct de tout conserver donne un sentiment de sécurité, mais il est contre-productif pour la création d'un album photo. Lorsque vous incluez trop de clichés similaires, l'album perd de son impact. Les meilleures photos de voyage, les moments marquants et les clichés familiaux pris sur le vif sont dilués par des images quasi identiques prises à quelques secondes d'intervalle. album photo qui préserve vos souvenirs Avec trente images bien choisies, on raconte une histoire plus forte qu'avec cent cinquante images médiocres. Avant de commencer à mettre en page, faites un tri impitoyable de vos photos. Supprimez tout ce qui est flou, mal éclairé ou qui fait double emploi avec une meilleure prise de vue. Ce qui restera vaudra vraiment la peine d'être imprimé.
Quelle est la meilleure façon de trier les photos avant de créer un livre photo ?
La meilleure façon de trier les photos avant de créer un album est de rassembler toutes les images pertinentes dans un seul dossier ou album, puis de les organiser chronologiquement ou par événement. Supprimez tôt les doublons et les photos floues. Visez à ne conserver que les images qui représentent clairement les moments que vous souhaitez préserver.
Un flux de travail de tri pratique ressemble à ceci :
- Rassemblez toutes les photos de toutes les sources en un seul endroit
- Faites une première passe rapide pour supprimer les refus évidents : flous, surexposés ou clichés quasi identiques
- Groupez les photos restantes par événement, voyage ou période.
- Dans chaque groupe, choisissez la meilleure version d'un moment répété.
- Vérifiez votre sélection finale et confirmez qu'elle raconte une histoire cohérente du début à la fin
Ce processus ne doit pas prendre beaucoup de temps. Même une séance de tri de 20 minutes avant de commencer à assembler votre livre rendra la mise en page naturelle plutôt qu'artificielle.
Combien de photos devriez-vous inclure dans un album photo ?
Un album photo standard fonctionne mieux avec 20 à 60 photos pour une mise en page typique de 20 à 40 pages. Moins de photos donnent à chaque image plus d'espace et d'impact visuel. Plus de photos peuvent fonctionner pour des livres plus longs couvrant de longues périodes, mais la qualité prime toujours sur la quantité.
Le bon nombre dépend de l'histoire que vous racontez. Un voyage d'un week-end est bien servi par 25 à 35 belles images. Un livre de bilan annuel couvrant douze mois peut facilement contenir 60 à 80 photos sans paraître surchargé, surtout si vous les regroupez par mois ou par saison.
Une règle empirique utile : si vous vous demandez si une photo est suffisamment bonne pour être incluse, elle ne l'est probablement pas. Chaque image de votre livre doit mériter sa place. Lorsque vous supprimez les clichés limites, ceux qui restent portent plus de poids émotionnel.
Comment choisir les meilleures photos parmi des centaines de clichés ?
Pour choisir les meilleures photos d'une grande collection, recherchez trois qualités : une mise au point nette, un bon éclairage et un sujet clair. Privilégiez les photos où les personnes regardent l'appareil photo ou sont réellement engagées dans le moment. Supprimez toute photo qui a un double presque identique, et ne conservez que la version la plus réussie.
Au-delà de la qualité technique, considérez la résonance émotionnelle. Une photo légèrement imparfaite d'un rire authentique bat souvent un portrait techniquement parfait mais plat. Lorsque vous sélectionnez des photos pour un livre, vous organisez une histoire, pas un portfolio. Demandez-vous si chaque image ajoute quelque chose de nouveau au récit ou répète simplement un moment déjà couvert par une autre photo.
Si vous travaillez sur un grand lot, une méthode en deux passes est utile. Dans la première passe, supprimez tout ce qui est techniquement médiocre. Dans la seconde passe, appliquez le filtre émotionnel et coupez tout ce qui n'ajoute rien à l'histoire. La plupart des gens constatent que leur sélection diminue de 50 à 70 % après deux passes, ce qui est exactement là où vous voulez être.
Faut-il organiser les photos par date, événement ou lieu ?
Organiser les photos par événement est généralement l'approche la plus efficace pour un album photo car les événements ont un début, un milieu et une fin naturels, créant un flux lisible. L'organisation par date fonctionne bien pour les annuaires ou les résumés mensuels. Le lieu convient le mieux aux livres de voyage où la géographie est le fil conducteur principal.
La structure adéquate dépend du sujet du livre. Si vous documentez un seul voyage, une organisation par lieu ou par jour est logique. Si vous créez un annuaire familial, une organisation par événement – comme un anniversaire, une fête ou un événement marquant de la scolarité – donne à chaque section une identité claire et rend le livre plus facile à parcourir.
La combinaison de différentes structures provoque souvent de la confusion. Choisissez un principe d'organisation et appliquez-le de manière cohérente tout au long du livre. En cas de doute, l'ordre chronologique par date des événements est le plus sûr par défaut. Il reflète le fonctionnement de la mémoire et donne au livre une progression naturelle que tout lecteur peut suivre.
Quelle est la façon la plus simple d'organiser les photos du téléphone pour un album photo ?
La manière la plus simple d'organiser les photos de téléphone pour un album photo est d'utiliser les albums intégrés de votre téléphone ou une application photo qui regroupe automatiquement les images par date ou par lieu. Créez un album dédié aux photos que vous souhaitez inclure, déplacez-y vos prises sélectionnées, et travaillez à partir de cet ensemble organisé plutôt qu'à partir de votre pellicule complète.
La plupart des téléphones incluent désormais des fonctionnalités intelligentes qui regroupent automatiquement les photos par voyage ou événement. Ces regroupements constituent un excellent point de départ. Vous pouvez examiner ce que le téléphone a rassemblé, supprimer les clichés qui n'y appartiennent pas et obtenir ainsi une sélection propre et prête à l'emploi, sans avoir à trier manuellement des milliers d'images.
Si votre pellicule est volumineuse et désorganisée, la fonction de recherche de la plupart des applications de photos vous permet de filtrer par plage de dates, par lieu ou même par sujet. La recherche d'un mois ou d'un lieu spécifique peut rapidement faire apparaître les images pertinentes, que vous pouvez ensuite déplacer dans un album dédié avant de commencer à créer votre livre.
Comment PastBook simplifie l'organisation de photos
Trier des photos manuellement prend un temps que la plupart des gens n'ont pas. Nous avons construit PastBook pour supprimer cette friction. Voici ce que l'application fait pour vous automatiquement :
- Sélection de photos assistée par IA : L'application analyse votre galerie de photos et sélectionne les meilleures prises en fonction de la qualité de l'image et du contexte, vous évitant ainsi d'avoir à examiner chaque photo vous-même.
- Suppression automatique des doublons : Les photos similaires et quasi identiques sont filtrées, ne laissant que la meilleure version de chaque instant.
- Regroupement intelligent par date, lieu ou album : Choisissez une période, un voyage spécifique ou un album, et l'application crée une mise en page complète et prête à imprimer en moins de 60 secondes.
- Personnalisation selon vos conditions : Une fois le livre généré, vous pouvez échanger les photos, ajuster les pages ou l'approuver tel quel. le gros du travail est déjà fait.
Que vous conserviez des souvenirs de vacances en famille, que vous documentiez une année de moments importants ou que vous prépariez un cadeau plein de sens, PastBook transforme un album photo débordant en un beau livre photo avec un minimum d'efforts de votre part. Téléchargez l'application PastBook et créez votre premier livre photo dès aujourd'hui.